無料SSL「Let’s Encrypt」でワイルドカードを設定し、ValueDomainで自動更新する
アフィリエイト広告を利用しています
このページの内容が役に立ったら X (旧twitter) でフォローして頂けると励みになります
挨拶や報告は無しで大丈夫です
社内資料として非公開していた情報を整理しながら公開していくシリーズです。
若干情報が古い場合もありますがご了承ください。
さて今回は、無料SSLで有名なLet's Encryptについて書いていってみたいと思います。
事前準備
まずは確認しましょう。
rpm -qa | grep centos-releasecentos-release-7-9.2009.2.el7.centos.x86_64Certbot のインストール
CentOS7の場合
yum install epel-release
yum install certbot
AlmaLinux / RockyLinuxの場合
2024年以降(?)の新しいLinuxでは snapd からインストールする形に変わっています
# 確認
dnf --enablerepo=epel list snapd

# インストール
dnf --enablerepo=epel install snapd

# 有効化
systemctl enable --now snapd.service snapd.socket

# リンク
ln -s /var/lib/snapd/snap /snap

# コアをインストール
snap install core

# Warning が出たら、「セッションを再開」みたいに書かれてるのでターミナルを開き直す

# コアをリフレッシュ
snap refresh core

# certbot をインストール
snap install --classic certbot
Certbot のバージョンを確認
certbot --versioncertbot 1.11.0自動更新を設定する場合
Let's Encryptは3カ月以内ごとに更新処理をしないといけないことで有名です。
最初に説明する方法は最初から最後まで手動で行う方法です。
自動更新を考えている場合は、二度手間になりますので「バリュードメイン / Value Domainで証明書の自動更新設定」から始めてると良いです。
ワイルドカードドメインを登録
example.com は登録したいドメインに書き換えてください
下記の例では、「*.example.com」と「example.com」を登録しています
certbot certonly \
--manual \
--server https://acme-v02.api.letsencrypt.org/directory \
--preferred-challenges dns \
-d *.example.com \
-d example.com \
-m sample@example.com \
--agree-tos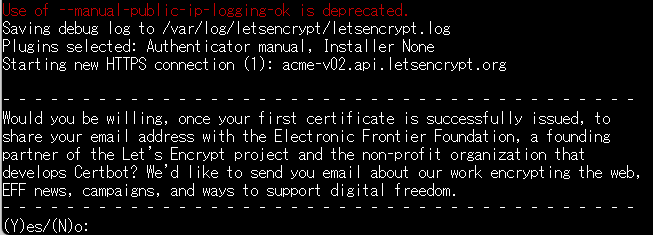
最初の証明書が正常に発行されたら、Let's Encrypt プロジェクトの創設パートナーであり、Certbot を開発している非営利団体である Electronic Frontier Foundation に電子メール アドレスを共有していただけますか? Web の暗号化に関する私たちの取り組み、EFF のニュース、キャンペーン、デジタルの自由をサポートする方法についての電子メールをお送りします。
y を入力してEnter
下記、本当は英語ですが重要情報を含むのでスクショは無しで、日本語にすると次のような内容です。
アカウントが登録されました。
*.example.com および example.com の証明書を要求しています
次のチャレンジを実行しています:
example.com の dns-01 チャレンジ
example.com の dns-01 チャレンジ
次の値を持つ _acme-challenge.example.com という名前で DNS TXT レコードを展開してください:
xxxxxxxxxxxxxxxxxxxxxxxxxxxx
続行する前に、レコードが展開されていることを確認してください。
画面には「Press Enter to Continue」と出ていると思いますが、まだ次に進みません。
DNSの設定
設定しようとしているドメインのDNS設定画面を開きます。
txtレコードの
_acme-challenge.example.com に
xxxxxxxxxxxxxxxxxxxxxxxxxxxx を設定します。
指定方法は業者により異なりますが、私が管理しているところでは次のように指定します
txt _acme-challenge xxxxxxxxxxxxxxxxxxxxxxxxxxxxターミナルに戻り、Enter で進みます。
txtレコードの反映がまだなら進めない場合があります。
Enter をクリックするともう一度似たような表示になります。
よく見ると、コードが変わっています。
こちらもDNSの設定から登録します。
私の管理しているところでは次のように、2つ目として追加する形になります。
txt _acme-challenge xxxxxxxxxxxxxxxxxxxxxxxxxxxx
txt _acme-challenge yyyyyyyyyyyyyyyyyyyyyyyyyyyy
DNSを設定して、Enterを押すのが早いと失敗する可能性が高くなります。
数分程度ゆっくり待ってから Enter を押すなり工夫が必要になります。
証明書の確認
作成された証明書は次の場所にあります。
ls -la /etc/letsencrypt/livehttpd.confに設定
apache 2.4
SSLCertificateFile    /etc/letsencrypt/live/ドメイン/fullchain.pem
SSLCertificateKeyFile /etc/letsencrypt/live/ドメイン/privkey.pem
apache 2.2
SSLCertificateKeyFile   /etc/letsencrypt/live/ドメイン/privkey.pem
SSLCertificateFile      /etc/letsencrypt/live/ドメイン/cert.pem
SSLCertificateChainFile /etc/letsencrypt/live/ドメイン/chain.pem
apacheの再起動
設定を反映させるため再起動します。
/etc/init.d/httpd restartバリュードメイン / Value Domainで証明書の自動更新設定
ここで紹介する方法は特に自己責任で行ってください
プログラムが何を行っているか理解しないまま真似しないでください
前提として、PHP 7.2 以上がインストールされているものとします。
https://aulta.co.jp/technical/server-build/centos7/php/source-install-php-7-4-6
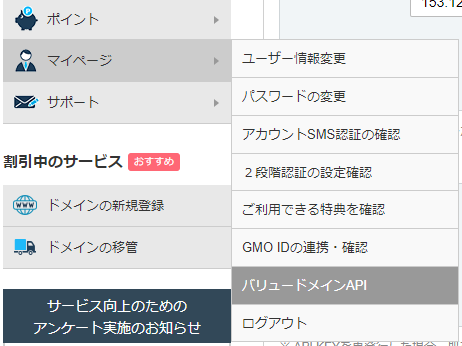
バリュードメインのAPIキーは、バリュードメインにログインして「マイページ > バリュードメインAPI」にあります。
最新版はGithubにあります
次のセクションからプログラムの説明をしていますが、若干古くなっております
最新版はGithubに入れておりますので参考にされる場合はGithubのほうをご確認ください。
https://github.com/aulta/letsencrypt-wildcard-dns-for-value-domain
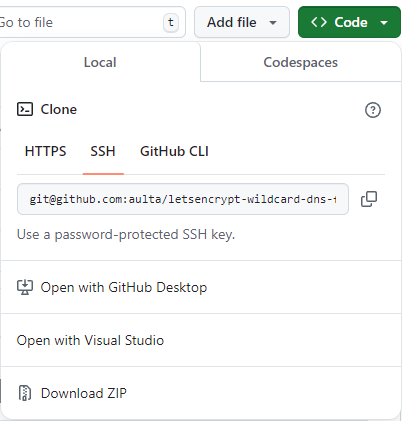
ダウンロード
GitHubにアクセスし、「Code」から「Download ZIP」へと進みます。
https://github.com/aulta/letsencrypt-wildcard-dns-for-value-domain
ファイルの配置
解凍してできた「update_lets_encrypt」を任意の位置に配置してください。
ここでは説明のため /root/update_lets_encrypt に配置した前提で進めます。
他の場所に配置した場合はパスを読みかえてください。
設定ファイルの編集
APIキーを保存する設定ファイルを作成します。
vi /root/update_lets_encrypt/config.php<?php
/**
* 設定ファイル
*
* @var array $config
*/
$config = [];
// APIキー
$config['value_domain_api_key'] = 'バリュードメインで発行したAPIキー';
// PHP
$config['php_command'] = 'php';
// https://aulta.co.jp/technical/server-build/centos7/php/source-install-php-7-4-6
// $config['php_command'] = '/usr/local/lib/php-7.1.6-mysqlc-mysqlnd/bin/php-7.1.6-mysqlc-mysqlnd';
// ログ
$config['log_path'] = '/var/log/update_lets_encrypt_' . date('Y') . '.log';
// DNSの反映を待機する時間 (秒)
$config['wait_for_dns_propagation'] = 130;
// ドメイン
$config['certbots'] = [];
$config['certbots'][] = [
'execution' => true,
'dns' => 'value_domain',
'mail' => 'user@example.com',
'domain' => 'example.com',
'domains' => [
'*.example.com',
'example.com'
]
];
// 2つ目
$config['certbots'][] = [
'execution' => true,
'dns' => 'value_domain',
'mail' => 'user@example2.com',
'domain' => 'example2.com',
'domains' => [
'*.example2.com',
'example2.com'
]
];
// 3つ目
$config['certbots'][] = [
'execution' => true,
'dns' => 'value_domain',
'mail' => 'user@example3.com',
'domain' => 'example3.com',
'domains' => [
'*.example3.com',
'example3.com'
]
];手動で実行する
次のように実行します
php /root/update_lets_encrypt/execute.phpまたは
/usr/local/lib/php-7.1.6-mysqlc-mysqlnd/bin/php-7.1.6-mysqlc-mysqlnd /root/update_lets_encrypt/execute.phpCRONに登録する
手動で動作することを確認できたらCRONで自動化しておきます。
crontab -e(例)頻繁に行う必要はないので10日ごとくらいで良いと思います。
0 2 10,20,30 * * php /root/update_lets_encrypt/execute.phpこのページの内容が役に立ったら X (旧twitter) でフォローして頂けると励みになります
本ページの内容は可能な限り正確な情報を提供するよう努めていますが、内容の正確性・最新性・安全性を保証するものではありません。本情報を利用して生じたいかなる損害についても、当方は一切の責任を負いません。実施にあたっては必ずご自身の判断と自己責任にてお願いいたします。