Postfix / Dovecot の組合せでメールサーバを用意
アフィリエイト広告を利用しています
このページの内容が役に立ったら X (旧twitter) でフォローして頂けると励みになります
挨拶や報告は無しで大丈夫です
さくらのVPSにAlmaLinux9.3をインストールした覚書です。
ここからはいよいよ本来の目的であるメールサーバの構築に入っていきます。
なお本番環境で利用される場合はここにある内容だけを鵜呑みにせずセキュリティ専門家に相談されることをお勧めします。
環境
| 実施日 | 2024-04-28 |
| サーバ | さくらのVPS 2G
|
| OS | AlmaLinux9.3 |
cat /etc/redhat-releaseAlmaLinux release 9.3 (Shamrock Pampas Cat)設定の確認
順番が前後しますが、設定などの確認方法を先に載せておきます。
postfix checkpostconf -ndovecot -nPostfixのインストール確認
postfixがインストールされていることを確認します。
postconf -d | grep mail_versionmail_version = 3.5.9
milter_macro_v = $mail_name $mail_versionまだの場合は下記よりインストールを行います。
AlmaLinux9.3にメールサーバのPostfixをインストール
PCREサポートの確認
postconf -m「pcre」が含まれているか確認し、なければインストールします。
dnf install postfix-pcreDovecotのインストール確認
Dovecotがインストールされていることを確認します。
rpm -qa dovecotdovecot-2.3.16-10.el9.x86_64main.cf の設定(変更)
postfixを設定していきます。
ここでは「mail.example.com」をメールドメインとして設定することにします。
「mail.example.com」を実際に使用するメールドメインに読みかえてください。
vi /etc/postfix/main.cf項目自体は main.cf に既にあると思いますので、下記のように書き換えます。
# サーバの完全修飾ドメイン名(FQDN)
myhostname = mail.example.com

# サーバが属するドメイン名
mydomain = example.com

# メールの送信元アドレスに使用されるデフォルトのドメイン
myorigin = $mydomain

# Postfixがメールを受信するために待ち受けるインターフェース
inet_interfaces = all

# ローカルで受信し配送するメールの対象ドメイン
# = の右は何もなし = ローカル配送の対象ドメインは無し
mydestination=

# デフォルトですべてコメントになっているはずなのでそのまま
# デフォルトでローカルからのみ許可
# mynetworks で引っかかっても、あとで設定するSMTP認証が通ればOK
# mynetworks = ・・・

# このサーバがリレーを許可するドメイン
relay_domains = $mydestination

# ユーザーのメールを保存するフォーマットとディレクトリ
home_mailbox = Maildir/

# SMTP サーバが接続を受けた際にクライアントに送信するグリーティングメッセージ
smtpd_banner = $myhostname ESMTP unknown
main.cf には他にも設定することがあるのですが、まずはここまでで一区切りとします。
main.cf に設定(追記)
先ほどの内容は既にある項目への「書き換え(確認含む)」でした。
次は、デフォルトでは main.cf に無い項目を追加します。
vi /etc/postfix/main.cfファイルの末尾に書き足していきます。
省略してもデフォルトで同じ値になるものもありますが、理解のために明示的に書き記します。
# "user%domain" の形から "user@domain" への書き換えを有効にする
allow_percent_hack = yes

# "site!user" から "user@site" への書き換えを有効にする
swap_bangpath = yes

# 古い MicroSoft Outlook Express に対応
broken_sasl_auth_clients = yes

# Postfix SMTP サーバの SASL 認証を有効にする
smtpd_sasl_auth_enable = yes

# 許可しない認証方式
#     noplaintext : 平文パスワードを使う認証方法を許可しない
#     noactive : non-dictionary active 攻撃に脆弱な認証方法を許可しない
#     nodictionary : passive dictionary 攻撃に脆弱な認証方法を許可しない
#     noanonymous : 匿名ログインを許可しない
# smtpd_sasl_security_options = noanonymous,noplaintext
smtpd_sasl_security_options = noanonymous

# マルチドメイン環境では指定しない(コメントにしておく)
# smtpd_sasl_local_domain = $mydomain
# smtpd_sasl_local_domain = $myhostname

# 受信メールの制限
#smtpd_recipient_restrictions = permit_mynetworks,permit_sasl_authenticated,reject_unauth_destination
smtpd_recipient_restrictions = permit_sasl_authenticated,permit_mynetworks,reject_unauth_destination

# SMTPサーバがクライアントからSMTP接続の要求を受けた際の制限
smtpd_client_restrictions = permit_mynetworks,
#                            reject_rhsbl_client rhsbl.ahbl.org,
                            reject_rbl_client spamcop.net,
                            reject_rbl_client dynablock.wirehub.net,
                            reject_rbl_client sbl.spamhaus.org,
#                            reject_unknown_client,
                            permit

# Postfix SMTP サーバが MAIL FROM コマンドの場面で適用する制限
# smtpd_sender_restrictions = reject_unknown_sender_domain

# 仮想ユーザーのメールボックスへメールを配送する設定
local_transport = virtual

# virtualhostを使っているので mailbox_command ではなく virtual_transport を使う
# virtual_transport = virtual
virtual_transport = procmail

# virtual_alias_maps = hash:/etc/postfix/virtual
virtual_alias_maps = hash:/etc/postfix/virtual, pcre:/etc/postfix/virtual.pcre
virtual_alias_domains = $virtual_alias_maps
virtual_mailbox_base = /home/user_mails
virtual_mailbox_domains = /etc/postfix/virtual_domains
virtual_mailbox_maps = hash:/etc/postfix/virtual_maps
virtual_minimum_uid = 499
virtual_uid_maps = static:5000
virtual_gid_maps = static:5000

transport_maps = hash:/etc/postfix/transport

message_size_limit = 20971520
fatal: no SASL authentication mechanisms
次のエラーになるときは smtpd_sasl_security_options を確認してみてください
postfix/smtpd[1590]: fatal: no SASL authentication mechanisms
postfix/master[1533]: warning: process /usr/libexec/postfix/smtpd pid 1590 exit status 1
postfix/master[1533]: warning: /usr/libexec/postfix/smtpd: bad command startup -- throttling
vi /etc/postfix/main.cfdovecotでSMTP認証をするならnoplaintext があるとダメです
# smtpd_sasl_security_options = noanonymous,noplaintext
smtpd_sasl_security_options = noanonymous
サブミッションポート(587)を有効化
サブミッションは Dovecot で行うため、Postfix 側は触らない
ファイアーウォールやパケットフィルターで 587 が塞がっていたら許可します。
SASLの準備と自動起動設定
SASLを確認します。
入れた記憶がなくても postfix を入れたときに一緒に入っていると思います。
rpm -qa | grep saslcyrus-sasl-lib-2.1.27-21.el9.x86_64この場合、lib だけインストールされています。
本体がないのでインストールします。
dnf install cyrus-saslrpm -qa | grep saslcyrus-sasl-lib-2.1.27-21.el9.x86_64
cyrus-sasl-2.1.27-21.el9.x86_64これでOKです。
自動起動を有効
systemctl enable saslauthd起動
systemctl start saslauthd停止
systemctl stop saslauthdステータスを確認
systemctl status saslauthdSASLの認証を変更する
SASLの認証方式を外部のプラグインを使用するように変更します。
ちなみにMySQLとPostfixの連携を考えていましたが、諸々を考えるとMySQLは使わない方が良さそうとなりました。(今回のケースではです)
dnf install cyrus-sasl-lib cyrus-sasl-plainsaslpasswd2 コマンドは後述する 「update_mailbox.php」に含まれます。
vi /etc/sasl2/smtpd.confpwcheck_method: auxprop
auxprop_plugin: sasldb
# pwcheck_method: saslauthd
mech_list: plain logindovecotのインストールと設定
dovecotの準備をしていきます
dnf install dovecotdovecot --version2.3.16 (7e2e900c1a)設定を変更する
vi /etc/dovecot/local.confsubmission_relay_host = smtp.example.com
protocols = imap pop3 lmtp submission
# SSL を使うとき (デフォルトではONになっている)
ssl_cert = </home/ssl/ssl-example.com.crt
ssl_key = </home/ssl/ssl-example.com-no-pass.key
ssl_ca = </home/ssl/ssl-example.com.ca
# mail_location = maildir:~/Maildir
mail_location = maildir:/home/user_mails/%d/%n/Maildir
passdb {
driver = passwd-file
args = /etc/dovecot/mail-password
}
userdb {
driver = passwd-file
args = /etc/dovecot/mail-password
}起動
systemctl start dovecot再起動
systemctl restart dovecot自動起動
systemctl enable dovecot状態
systemctl status dovecot設定の確認
postconf -ndovecot -nvirtual の確認
すべてコメントされていることを確認
vi /etc/postfix/virtual設定内容を反映させる
postmap /etc/postfix/virtualヴァーチャルディレクトリを作成
ディレクトリの雛形を用意する
メールディレクトリの雛形を作成します。
mkdir -p /etc/skel/Maildir/{new,cur,tmp}chmod -R 700 /etc/skel/Maildir/仮想ユーザーディレクトリ
mkdir /home/user_mailschmod 1777 /home/user_mailsprocmailrc の設定
dnf install procmail/etc/postfix/master.cf
次の内容を追記します。
# procmailrc
procmail  unix  -       n       n       -       -       pipe
  flags=R user=vmailuser argv=/usr/bin/procmail -t -m USER=${user} DOMAIN=${nexthop} /etc/procmailrc
/etc/procmailrc
procmail を設定していきます
vi /etc/procmailrcSHELL=/bin/bash
PATH=/usr/bin:/bin
DROPPRIVS=yes
# MAILDIR=$HOME/Maildir
MAILDIR=/home/user_mails/$DOMAIN/$USER/Maildir
DEFAULT=$MAILDIR/
# ロックファイル
LOCKFILE=/home/user_mails/.procmail.lock
# ログ出力先
# LOGFILE=$MAILDIR/.procmail.log
# LOGFILE=/home/takashi/logs/.procmail.log
LOGFILE=/home/user_mails/.procmail.log
# 詳細ログ出力
VERBOSE=OFF
# 未承諾広告メール削除
:0
* ^Subject:.*iso-2022-jp
* ^Subject:\/.*
* ? echo "$MATCH" | nkf -mwZ2 | sed 's/[[:space:]]//g' | egrep '未承諾広告※'
/dev/nullvi /etc/postfix/main.cfmain.cf には先の工程で下記を追記しているので確認だけしておきます。
vi /etc/postfix/main.cfvirtual_transport = procmailvmailuser ユーザーの作成
「vmailuser」ではなく名前はなんでも良いですが変える場合は master.cf など他の個所も統一します。
まずは 5000 のユーザーが作られていないことを確認します。
cat /etc/group | grep 5000何もでてこなければ作られていません。
作りましょう。
groupadd -g 5000 vmailuseruseradd -u 5000 -g vmailuser -s /sbin/nologin vmailuserログのローテーション
procmail のログのローテーションを設定します。
vi /etc/logrotate.d/procmail/home/user_mails/.procmail.log {
missingok
nocreate
notifempty
}メールユーザースクリプトの準備
メールユーザーの管理はスクリプトを使って行うことにします。
次のファイルを作成します。
メールアカウント設定
/root/mail/config_mail_users.php<?php
$config_mail_users = [
'real' => [
],
'virtual' => [
'example.com' => [
'sample1' => ['status' => 'use', 'password' => 'メールパスワード'],
'sample2' => ['status' => 'use', 'password' => 'メールパスワード'],
'sample3' => ['status' => 'use', 'password' => 'メールパスワード'],
],
'sub.example.com' => [
'sample' => ['status' => 'use', 'password' => 'メールパスワード'],
],
],
];メールアカウント設定の更新スクリプト
メール設定ファイルをpostfix向けのファイルに変換します
/root/mail/update_mailbox.php<?php
$config_mail_users = [];
include __DIR__ . '/config_mail_users.php';
$pathBase = '/home/user_mails';
if ( ! file_exists($pathBase)) mkdir($pathBase, 1777, true);
shell_exec('chmod 1777 ' . $pathBase);
$virtual_domains = '';
$virtual_maps = '';
$dovecot_passwd = '';
foreach($config_mail_users as $type => $domains){
foreach($domains as $domain => $accounts){
$useDomainAndVirtual = false;
foreach($accounts as $account => $setting){
$pathAccount = $domain . '/' . $account . '/Maildir';
$path = $pathBase . '/' . $pathAccount;
switch($setting['status']){
// 使用中
case 'use':
if ( ! file_exists($path)) mkdir($path, 0777, true);
$uidgid = '5000:5000';
if ($type == 'real'){
shell_exec('chmod 1777 '. $path);
$uidgid = shell_exec('id -u ' . $account) . ':' . shell_exec('id -g ' . $account);
} else if ($type == 'virtual'){
shell_exec('chown 5000:5000 ' . $path);
shell_exec('chmod 700 ' . $path);
$useDomainAndVirtual = true;
}
$virtual_maps .= $account . '@' . $domain . ' ' . $pathAccount . '/' . "\n";
$dovecot_passwd .= $account . '@' . $domain . ':{plain}' . $setting['password'] . ':' . $uidgid . ':::/home/user_mails/' . $domain . '/' . $account . ':/sbin/nologin:' . "\n";
shell_exec('echo "' . $setting['password'] . '" | /usr/sbin/saslpasswd2 -p -u ' . $domain . ' -c ' . $account);
break;
// 中断
case 'pause':
// 特に何もしない
// shell_exec('/usr/sbin/saslpasswd2 -d -u ' . $domain . ' ' . $account);
break;
// 削除
case 'delete':
// $path を rm -rf ですが、削除する場合は手動で行ってください
break;
}
}
if ($useDomainAndVirtual) {
$virtual_domains .= $domain . "\n";
}
}
}
file_put_contents('/etc/postfix/virtual_domains', $virtual_domains);
file_put_contents('/etc/postfix/virtual_maps', $virtual_maps);
file_put_contents('/etc/dovecot/mail-password', $dovecot_passwd);メールアカウント設定の更新スクリプト
vi /root/mail/update_mailbox.sh#!/bin/sh
/usr/bin/php /root/mail/update_mailbox.php
chmod 0600 /etc/postfix/virtual_maps
chown dovecot:dovecot /etc/dovecot/mail-password
chmod 0600 /etc/dovecot/mail-password
chgrp postfix /etc/sasl2/sasldb2
chmod 640 /etc/sasl2/sasldb2
/usr/sbin/postmap /etc/postfix/transport
/usr/sbin/postmap /etc/postfix/virtual
/usr/sbin/postmap /etc/postfix/virtual_maps
systemctl reload postfix
systemctl restart dovecot
systemctl reload postfix
systemctl restart dovecotchmod 0700 /root/mail
chmod 0600 /root/mail/*
chmod 0700 /root/mail/update_mailbox.sh更新の流れ
config_mail_users.php を編集して update_mailbox.sh を実行
vi /root/mail/config_mail_users.php/root/mail/update_mailbox.shメールソフトの設定も見直し
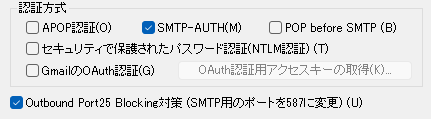
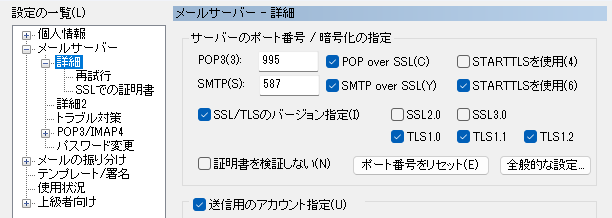
次のように、POP3S、SMTPはTLSを使うように設定変更が必要になります。
このページの内容が役に立ったら X (旧twitter) でフォローして頂けると励みになります
本ページの内容は可能な限り正確な情報を提供するよう努めていますが、内容の正確性・最新性・安全性を保証するものではありません。本情報を利用して生じたいかなる損害についても、当方は一切の責任を負いません。実施にあたっては必ずご自身の判断と自己責任にてお願いいたします。